How to Accept Mobile Money Payments on Telegram Chatbot using NotchPay API
Learn what to do and not do to accept Mobile Money payments on your Telegram Chatbot with code examples.


I built a Telegram chatbot many weeks ago and I needed to enable mobile money payment from users, to achieve that I used NotchPay (https://www.notchpay.co), a Cameroonian Payment Gateway platform that is very easy and quick to set up. In this article, I will go through the steps of my implementation.
Typically a mobile money payment happens in 3 steps, the initialization, the payment itself, and the verification. Let's dive into this using this blueprint.
The payment initialization
This is what happens when the user chooses what to pay and how much to pay, in my case it is a subscription(billing plan) the user might need to pay a weekly subscription valued at 600 FCFA (XAF) or a monthly subscription at 2000 FCFA (XAF). At this step, I would create a payment on NotchPay platform like this
const endpointUrl = "https://api.notchpay.co/payments/initialize";
const cb_url = process.env.BOT_REDIRECT_URL; // url where the user is redirected

const paymentRequest = {
      email: userEmail,
      amount: paymentAmount,
      currency: "XAF", // Replace with the appropriate currency code
      description: "Payment for Subscription a subscription",
      reference: transactionId,
      callback: `${cb_url}?tid=${transactionId}`, // a callback url
      customer_meta: meta,
    };

    let response;

    // Send a POST request to the NotchPay API using Axios
    try {
      response = await axios.post(endpointUrl, paymentRequest, {
        headers: {
          Authorization: `${apiKey}`,
          "Content-Type": "application/json",
        },
      });
    } catch (error: any) {
      if (error.response) {

        console.log("HTTP ERROR");
        console.log(error.response.data);
        console.log(error.response.status);
        console.log(error.response.headers);
      } else if (error.request) {

        console.log("REQUEST ERROR");
        console.log(error.request);
      } else {
        // Something happened in setting up the request that triggered an Error
        console.log("UNKNOWN ERROR");
        console.log("Error", error.message);
      }

      console.log("[ERROR_CAUTH]");
      return null;
    }

if (response.status >= 200 && response.status < 300) {

      const paymentLink = response.data.transaction.reference;
      if (paymentLink) {
        // Return the payment link
        return `https://pay.notchpay.co/${paymentLink}`;
      } else {
        console.error(
          `[PAYMENT] - error while initiating the transaction on [NOTCHPAY] - 1 ${response.data}`
        );
        return null;
      }
    } else {
      console.error(
        `[PAYMENT] - error while initiating the transaction on [NOTCHPAY] - 2 ${response.status}`
      );
      return null;
    }
At this point, I need to show the paymentLink to the user, after clicking he will end up on a checkout page branded by notchpay, where the user has to choose a payment method and input his number. Do note this line
...
callback: `${cb_url}?tid=${transactionId}`,
...
This is the link where the user is redirected after a payment, you should set a page on your site informing the user that the payment in been successfully processed (not done, since it might still occur an issue). Here is a screenshot of how the bot will display it

As you can see, the user have choosed a subscription and the bot displayed the payment link.
The payment itself
The payment happend on the next screen shows what the user see upon click the link
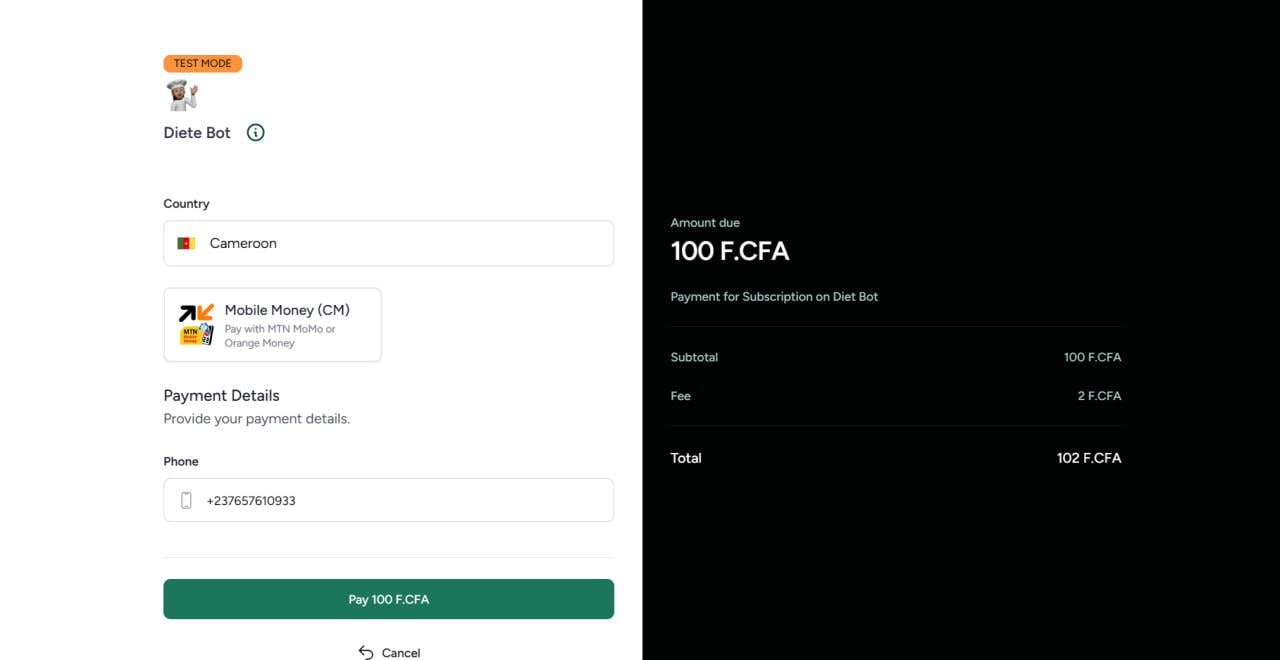
As NotchPay user we don't have much to do here, all happen on their platform, the client will input his phone number or credit card information after choosing the country where he belongs and click on "pay X F.CFA", if it's a mobile money transaction the user will receive a prompt on his phone requesting to validate a payment on his mobile wallet, otherwise an error will be displayed on NotchPay page itself. After this, if the payment is successful the user is redirected to the callback URL (the one you specified while creating the payment link), note that payment will usually take under 5 minutes to be confirmed by the client.
The verification
When a payment is made on NotchPay, your platform will receive a notification via what is called a webhook, it will contain information about a specific payment that has been updated, What you have to do here is to verify the state of said payment, you should never update your database right away with the information contained into the webhook (it might have been created and sent to you by a third party other than NotchPay), you should only retrieve the transaction reference and do the following:
Check for the notch pay signature
Check if the payment exists in your database (via his reference)
Check the status: if it is still ACTIVE or PENDING COMPLETED etc.
If these checks are done and successful you have to call the verification API on NotchPay to retrieve the status of this specific payment on their platform before updating yours. Here is how I did it.
I used a little express server that exposes a route in POST, where the webhook is sent, like this.
async function verifyPaymentStatus(
  transactionId: string
): Promise<{ status: any; transaction?: any }> {
  try {
    const notchPayApiUrl = "https://api.notchpay.co";
    const endpoint = `/payments/${transactionId}`;
    let response;
    try {
      response = await axios.get(`${notchPayApiUrl}${endpoint}`, {
        headers: {
          Authorization: `${apiKey}`,
        },
      });
    } catch (apiError: any) {
      if (apiError.response) {
        console.log("HTTP ERROR");
        console.log(apiError.response.data);
        console.log(apiError.response.status);
      } else if (apiError.request) {
        console.log("REQUEST ERROR");
        console.log(apiError.request);
      } else {
        console.log("UNKNOWN ERROR");
        console.log("Error", apiError.message);
      }
      console.log("[ERROR_CAUTH]");
      return { status: null, transaction: apiError.response.data };
    }
    if (response.status >= 200 && response.status < 300) {
      return { status: true, transaction: response.data };
    } else {
      console.error(
        "NotchPay API request failed with status:",
        response.status
      );
      return { status: null };
    }
  } catch (error) {
    console.error("Error verifying payment status:", error);
    return { status: null };
  }
}

app.get("/[MY_CALLBACK_URL]", async (req: Request, res: Response) => {
  const hash = crypto
    .createHmac("sha256", apiKey)
    .update(JSON.stringify(req.body))
    .digest("hex");

  if (hash != req.headers["x-notch-signature"]) {
    return res.status(403);
  }
  try {
    // Extract data from the request
    const { tid, reference } = req.query as {
      tid: number;
      reference: string;
    };

    // extracting the transation from my database (supabase)
    let { data: payment_transaction, error } = await supabase
      .from("payment_transaction")
      .select("*")
      .eq("transaction_id", tid)

    if (error) {
      console.error("Error retrieving transaction:", error.message);
      res.status(400).send(JSON.stringify(error));
    }

    if (payment_transaction === null) {
      res.status(404).send(JSON.stringify({ error: "Transaction Not Found" }));
      return;
    }
    if (
      payment_transaction[0].status === "complete" ||
      payment_transaction[0].status === "canceled" ||
      payment_transaction[0].status === "failed"
    ) {
      res.status(200).send("Webhook received and processed successfully");
      return;
    }
    // actively verify the payment status on notchpay platform
    let paymentObject = await verifyPaymentStatus(reference);

    if (paymentObject.status == null) {
      res.status(503).send(
        JSON.stringify({
          error: "Provider server not available",
          data: paymentObject.transaction,
        })
      );
      return;
    }

    const transaction = paymentObject.transaction.transaction;
    const { error: tError } = await supabase
      .from("payment_transaction")
      .update({
        status: transaction["status"],
        api_response: [...payment_transaction[0].api_response, transaction],
      })
      .eq("transaction_id", tid)
      .select();
    if (tError) {
      console.log(`[webhook] An error occurred: ${tError.message}`);
      console.table(error);
      res.status(500).send("Internal Server Error");
    }


    // ... update the billing plan and the subscription code
    // diable existing subscription and enabling others
    res.redirect(`https://t.me/${BOT_TELEGRAM_USERNAME}`);
  } catch (error) {
    console.error("Error handling webhook:", error);
    res.status(500).send("Internal Server Error");
  }
});
The section that verifies the NotchPay signature is this one, this ensures that the webhook is coming from NotchPay and is related to your account.
const hash = crypto
    .createHmac("sha256", apiKey)
    .update(JSON.stringify(req.body))
    .digest("hex");

  if (hash != req.headers["x-notch-signature"]) {
    return res.status(403);
  }
In this section, I retrieve the payment transaction from my database and check his current known status, NotchPay will recall this URL and send the webhook if the response is different than HTTP 200 OK, the reason being the fact that it doesn't know the state of your system, it might be unavailable or an error or processing has happened, this is why you should keep a real logic while returning a response from the request.
let { data: payment_transaction, error } = await supabase
      .from("payment_transaction")
      .select("*")
      .eq("transaction_id", tid)

    if (error) {
      console.error("Error retrieving transaction:", error.message);
      res.status(400).send(JSON.stringify(error));
    }

    if (payment_transaction === null) {
      res.status(404).send(JSON.stringify({ error: "Transaction Not Found" }));
      return;
    }
    if (
      payment_transaction[0].status === "complete" ||
      payment_transaction[0].status === "canceled" ||
      payment_transaction[0].status === "failed"
    ) {
      res.status(200).send("Webhook received and processed successfully");
      return;
    }
In this section it will get the payment object on NotchPay and update the transaction status in the database, it will also save the complete JSON object received from NotchPay, I always do this in order to make sure I can audit this information later if I need to know what happened during the lifetime of a transaction. it's saved on the field api_response as an array (kind of history)
let paymentObject = await verifyPaymentStatus(reference);

    if (paymentObject.status == null) {
      res.status(503).send(
        JSON.stringify({
          error: "Provider server not available",
          data: paymentObject.transaction,
        })
      );
      return;
    }
    const transaction = paymentObject.transaction.transaction;
    const { error: tError } = await supabase
      .from("payment_transaction")
      .update({
        status: transaction["status"],
        api_response: [...payment_transaction[0].api_response, transaction],
      })
      .eq("transaction_id", tid)
      .select();
    if (tError) {
      console.log(`[webhook] An error occurred: ${tError.message}`);
      console.table(error);
      res.status(500).send("Internal Server Error");
    }
After this I can resume the actions that need to be taken after a payment happens, namely disabling existing subscriptions and enabling new one that corresponds to what the user paid for. In the end, I will just redirect the user to the bot URL
res.redirect(`https://t.me/${BOT_TELEGRAM_USERNAME}`);
This is because my system is a Telegram Chatbot, so it's necessary to resend him back to the chat UI.
Conclusion
I shared with you how I used NotchPay to accept payment (mobile money) for my telegram Chatbot, this happens via 3 steps Initiating the payment, the payment itself by the user, and the verification of the transaction. In this article I didn't cover our the subscription plan logic is made on the chatbot, it will be done in another piece of content itself, the process explained here can be used on a chatbot or website or anywhere to process a payment, it's doesn't need to be a subscription like here. Not that this process is roughly the same even for a payment with Paypal or stripe and most of the payment gateway out there.